
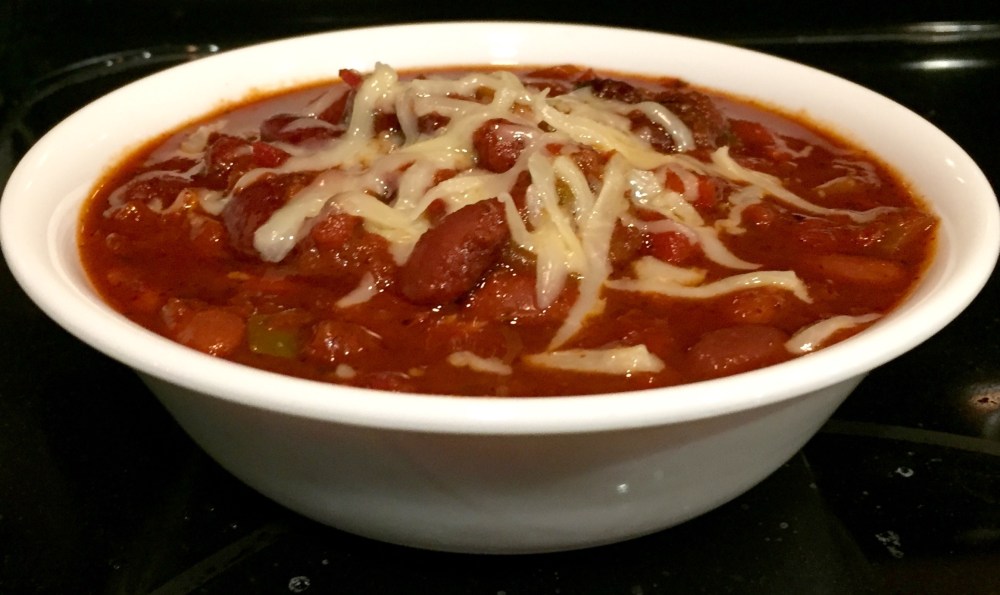
Nothing beats a hot bowl of chili on a blustery winter day. Plenty of things are tied, mind you, such as Homemade Hot Cocoa, French Honey Bread, and Beef Stew. But did you ever notice that chili is just as delicious in hot weather? There’s something about spicy food that makes you feel warmer in the winter and cooler in the summer. That makes chili an ideal choice for spring and fall when the weather can’t seem to make up its mind. In the past month, we’ve gone from highs in the 90s to highs in the low 60s and back again. It’s hard to know what to wear, let alone what to cook. Chili to the rescue!
I’ve become quite fond of heirloom beans lately, and have been ordering them from Rancho Gordo. The beans are fresher, for one thing, and have a much better flavor and texture. They’re available in such a wide variety that it’s hard to choose a favorite. So instead of trying to choose just one, I’ve chosen 3 to put in my chili. The toughest part in choosing the varieties was finding ones that cook at the same rate. The first time I tried mixing different varieties (and the second time, and the third) I wound up with some too firm, some perfect, and some mush. The chili still tasted good though! You can substitute your own favorite beans. Why should you cook your own beans from dried rather than canned? Not only do they taste better and have better texture, check out the photo of the bean broth in step 3 below. Thick, rich bean broth instead of water makes your chili thicker, more full-bodied, and far more delicious!
Several years ago, I started pre-cooking my beans before putting them in the slow cooker. They just seemed to take forever to soften otherwise. Recently, I learned there’s another good reason for this practice. If kidney beans don’t cook thoroughly enough (as has apparently happened on occasion in slow cookers), they can actually make you sick. How did I not know this until now? No idea. Other beans don’t contain as much of the stuff (phytohemagglutinin, if you want to know), but data on specific bean varieties is not easily found. You can read more at the FDA website. Since pre-cooking helps get the right texture anyway, it seems best to just pre-cook the darn things. Your chili (and your health) will be better for it!
I recently became an Instant Pot owner. It’s a clever electric pressure cooker that can also make yogurt and do a bunch of other things. It has quite the following; people seem to feel very strongly about it. I love it for cooking beans, hard-cooked eggs, and Beef Garam Masala. I did try adapting my chili recipe for the instant pot, and may eventually go that route. I think the slow cooker variety has better flavor, although it’s quite possible I’m imagining that. One thing’s for sure, though, and that’s that I can make almost twice as much in the slow cooker. Chili freezes really well, so I like to make a big pot even when I’m not feeding a crowd. By pre-cooking the beans in the Instant Pot, I save some time (and the annoyance of watching a pot), and get a great bean broth. Then I switch to the slow cooker. It’s an extra pot to wash, but I think it’s worth it. You can pre-cook your beans in whatever manner is most convenient (or least inconvenient) for you. You’ll find a printer-friendly version of the recipe at the bottom of this page.
“Beans are evil. Bad, bad beans!” –The Doctor
Beans are the one area where I emphatically disagree with The Doctor. I love beans! Maybe Amelia should have ordered hers from Rancho Gordo.
Ingredients:
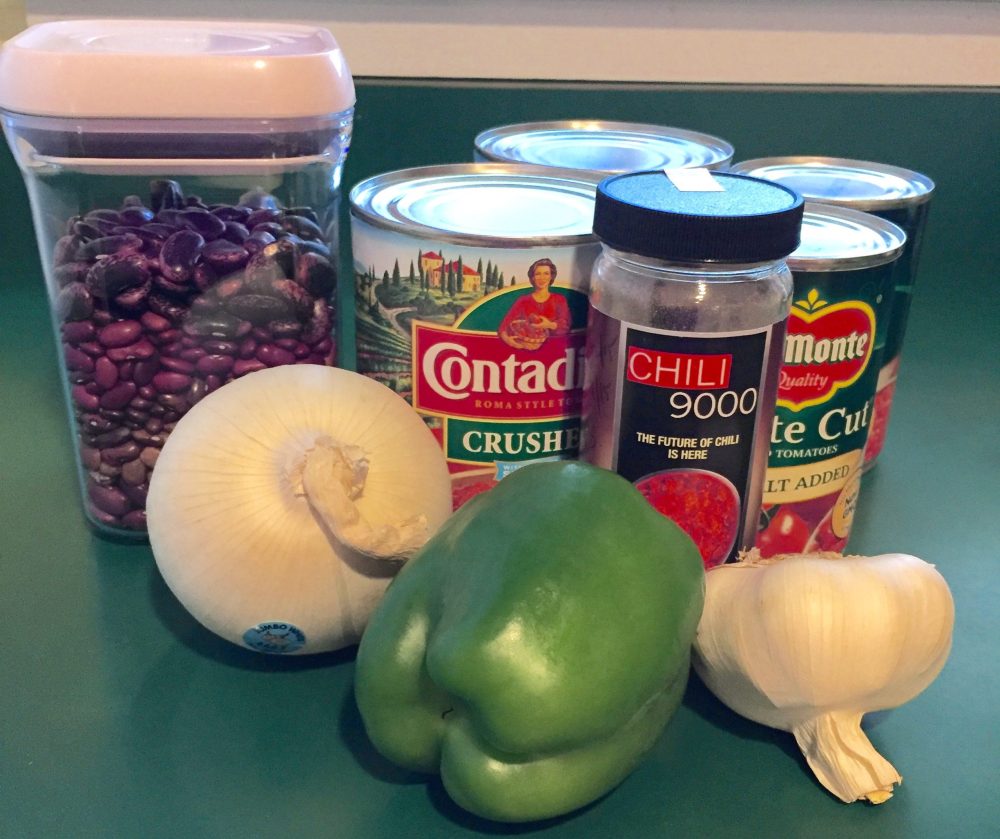
1 pound of assorted dry beans
1 fresh jalapeño pepper (optional)
1 Tbsp + 1 tsp olive oil, divided
1 small yellow onion
1 large white onion
1 large green bell pepper
6 cloves garlic, divided
2 (28-oz.) cans crushed tomatoes
2 (14-oz) cans of no salt added petite-cut diced tomatoes
⅓ – ½ cup chili powder, according to taste (I use Penzeys Chili 9000)
2 cups bean broth or water
Preparation:
1.) The night before, pick over your beans for any stones, debris, or bad beans. I used heirloom beans from Rancho Gordo: Vaquero, Good Mother Stallard, and Eye of the Goat, in roughly equal portions. Aren’t they beautiful?

Rinse the beans thoroughly. Place them in a large bowl, saucepan, or Instant Pot’s inner pot with several inches of water covering them. These are in a 4½-quart bowl so that it’s easy to see that they needed every drop of that water!


2.) To cook the beans in the Instant Pot:
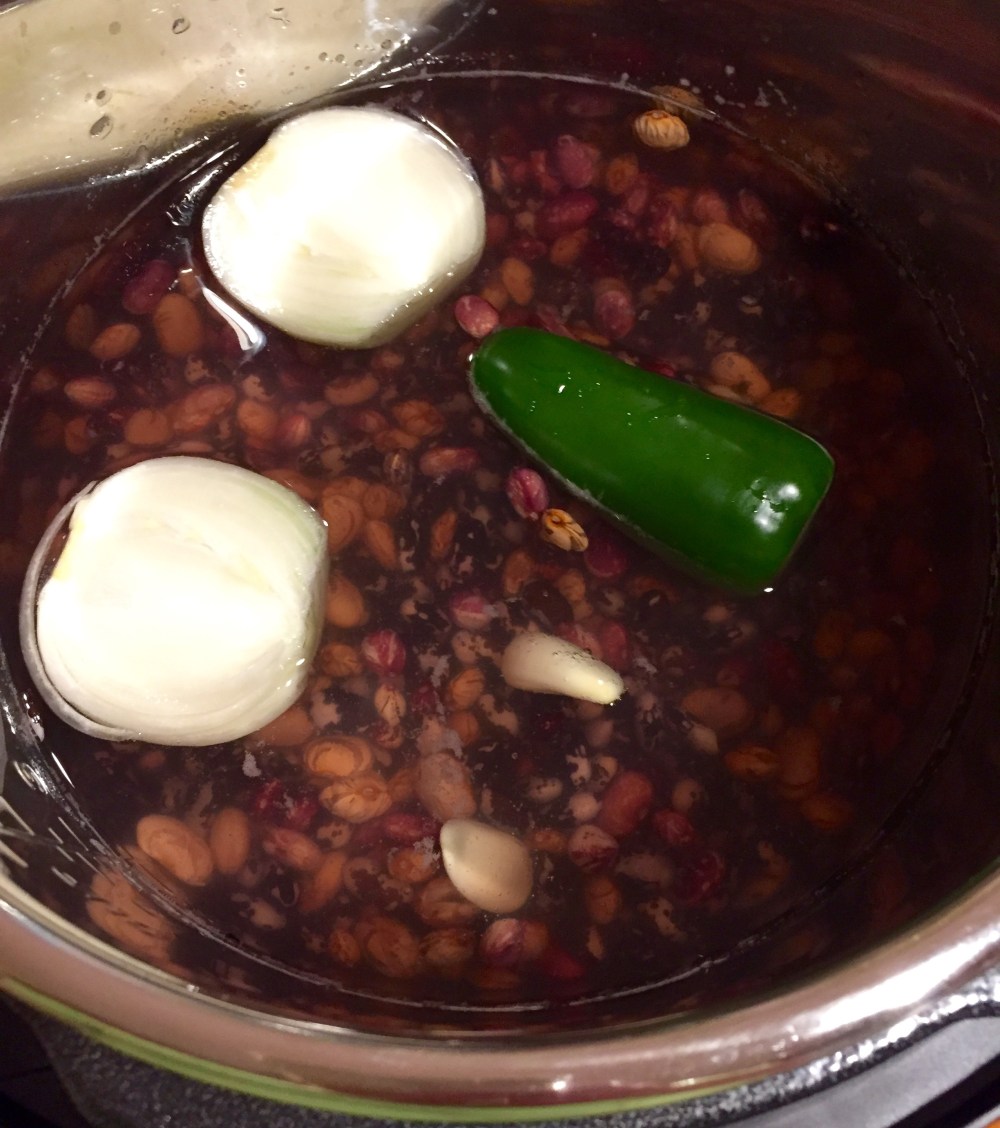
Use the Instant Pot’s inner pot to soak the beans, instead of a bowl or pan. Add water to cover the beans by a couple of inches, but the water plus beans should occupy no more than half the pot. Soak overnight. The next day, check to be sure the water is still about 1″-2″ above the beans, adding more if needed. If the beans have expanded to the point that they fill the pot halfway, I’ll usually go ahead and add a little more water just to keep them covered. The manufacturer says you shouldn’t do this, in case the beans swell even more and make frothy broth which then clogs the works or spews out the steam vent. So you may wish to play it safe and remove some of the beans to cook later if you’re running out of room. Add the jalapeno pepper (stem removed), 2 cloves of the garlic (peeled), the small onion (peeled and halved), and 1 tsp of the olive oil.
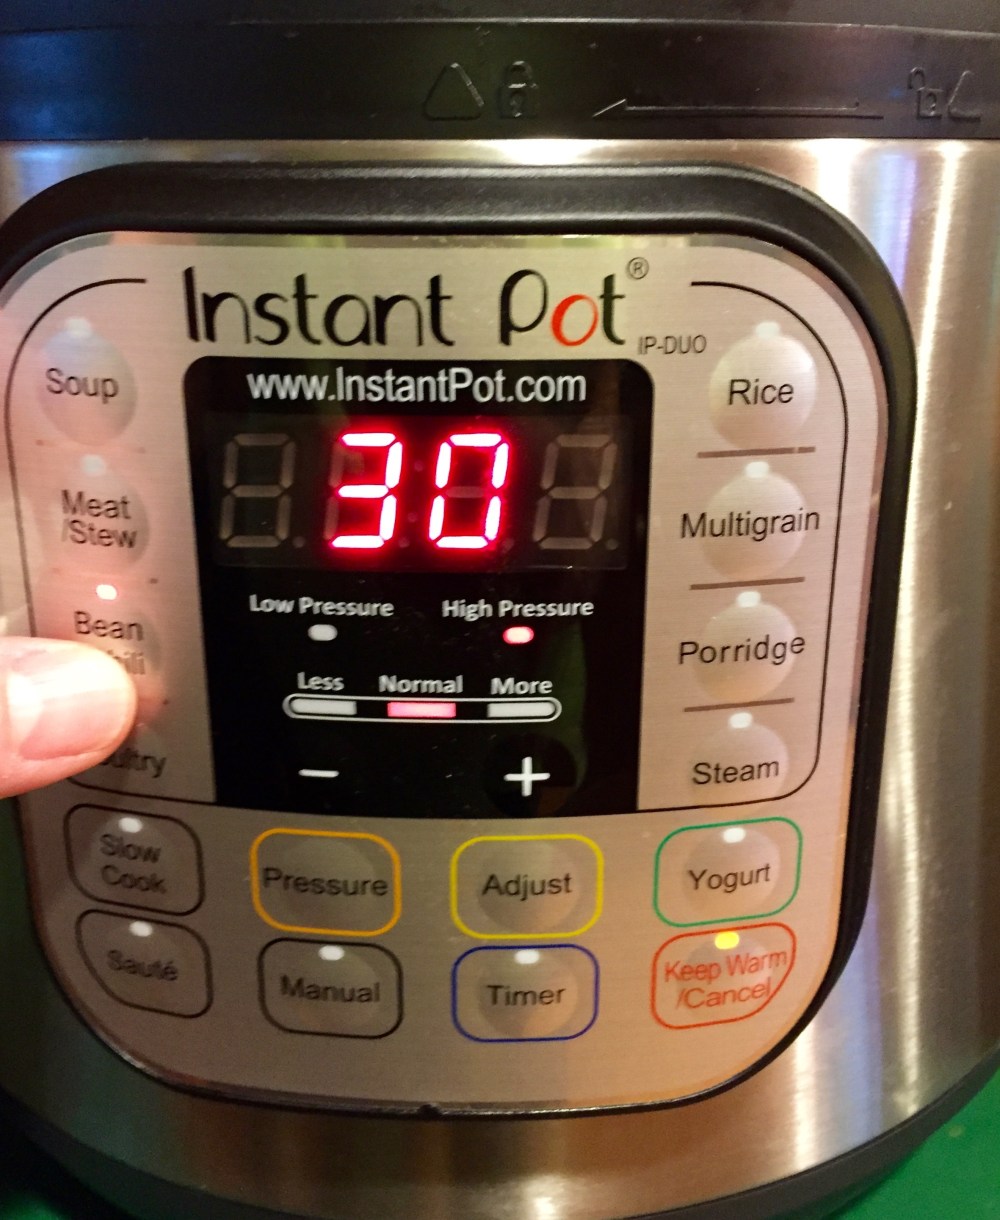
Put the inner pot into the Instant Pot. Close and lock the lid, close the steam vent, set the bean cycle and adjust to 30 minutes.
Allow a natural pressure release of 20 minutes. Check for doneness, adding more time if needed.
To cook the beans on the stovetop:
The next day, check to be sure the water is still about 1″-2″ above the beans, adding more if needed. Add the jalapeno pepper (stem removed), 2 cloves of the garlic (peeled), the small onion (peeled and halved), and 1 tsp of the olive oil, and bring to a boil. Let them boil vigorously for at least 10 minutes, then cook at a steady simmer for at least 30 minutes more, sometimes over an hour. How long you cook them depends on bean size, variety, and how long ago they were harvested. Keep an eye on the water level, to be sure the beans are always covered. They’re done when a sample bean is soft to the bite but not mushy.
3.) Use a fork or slotted spoon to remove the pepper, garlic, and onion.

Drain the beans, reserving two cups of the broth and discarding the rest.


If you don’t have two cups of broth, make up the difference with water or Homemade Vegetable Broth. Transfer the beans and the liquid to the pot of your slow cooker.
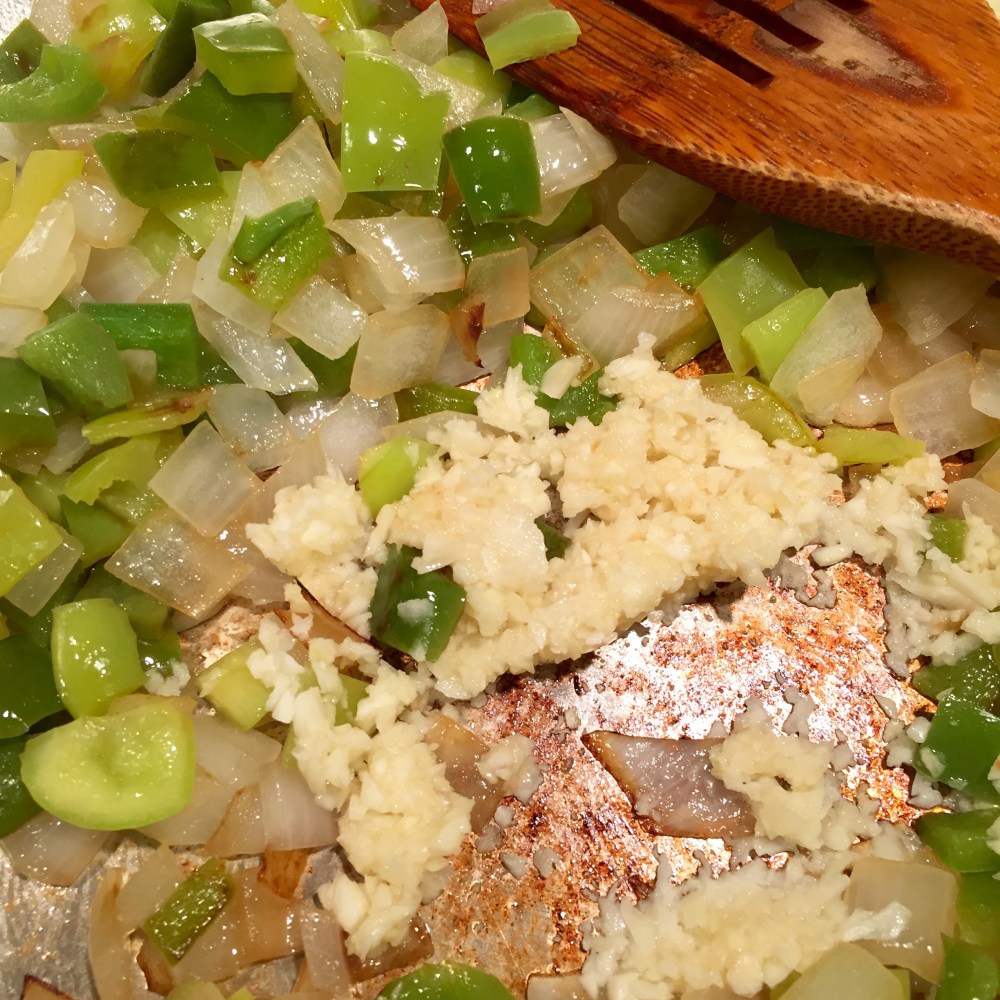
4.) While the beans cook, mince the garlic and chop the bell pepper and the onion. Heat the remaining tablespoon of oil in a large skillet over medium-high heat. Sauté the peppers & onions until just becoming soft with a little bit of browning.


5.) Clear a small spot, add a touch more oil if needed, & use that to sauté the garlic until fragrant, about 1 more minute.
6.) Pour one of the cans of diced tomatoes into the pan, juice and all, and use that to deglaze the pan. Scrape up all those yummy browned bits.

7.) Pour the pan contents into the crock pot, scraping the pan to get every last drop.
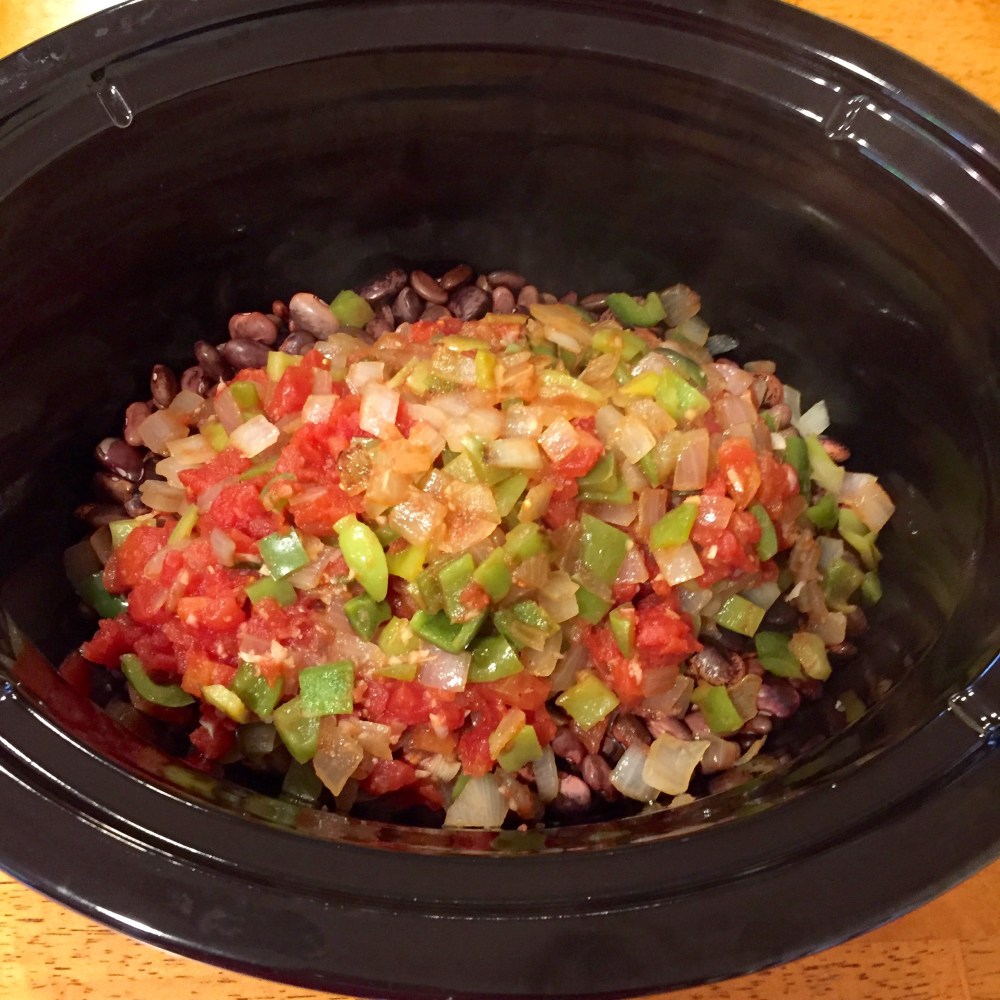
8.) Then pour the rest of the diced & crushed tomatoes in, add the chili powder, and stir. It will look pretty red at first, and develop a darker, richer color as it cooks. Cook for 8 to 10 hours on low. I like to serve chili with a bit of grated sharp cheddar, which of course you’ll omit if you want to keep it vegan.


Three-Bean Chili For A Crowd (Slow Cooker)
Ingredients
1 pound of assorted dry beans
1 fresh jalapeño pepper (optional)
1 Tbsp + 1 tsp olive oil, divided
1 small yellow onion
1 large white onion
1 large green bell pepper
6 cloves garlic, divided
2 (28-oz.) cans crushed tomatoes
2 (14-oz) cans of no salt added petit-cut diced tomatoes
⅓ – ½ cup chili powder, according to taste (I use Penzeys Chili 9000)
2 cups bean broth or water
Directions
1.) The night before, pick over your beans for any stones, debris, or bad beans. Rinse the beans thoroughly. Place them in a large bowl, saucepan, or Instant Pot inner pot with several inches of water covering them. These are in a 4½-quart bowl so that it’s easy to see that they needed every drop of that water!
2.) To cook the beans in the Instant Pot:
Use the Instant Pot’s inner pot to soak the beans, instead of a bowl or pan. Add water to cover the beans by a couple of inches, but the water plus beans should occupy no more than half the pot. Soak overnight. The next day, check to be sure the water is still about 1″-2″ above the beans, adding more if needed. If the beans have expanded to the point that they fill the pot halfway, I’ll usually go ahead and add a little more water just to keep them covered. The manufacturer says you shouldn’t do this, in case the beans swell even more and make frothy broth which then clogs the works or spews out the steam vent. So you may wish to play it safe and remove some of the beans to cook later if you’re running out of room. Add the jalapeno pepper (stem removed), 2 cloves of the garlic (peeled), the small onion (peeled and halved), and 1 tsp of the olive oil. Put the inner pot into the Instant Pot. Close and lock the lid, close the steam vent, set the bean cycle and adjust to 30 minutes. Allow a natural pressure release of 20 minutes. Check for doneness, adding more time if needed.
To cook the beans on the stovetop:
The next day, check to be sure the water is still about 1″-2″ above the beans, adding more if needed. Add the jalapeno pepper (stem removed), 2 cloves of the garlic (peeled), the small onion (peeled and halved), and 1 tsp of the olive oil, and bring to a boil. Let them boil vigorously for at least 10 minutes, then cook at a steady simmer for at least 30 minutes more, sometimes over an hour. How long you cook them depends on bean size, variety, and how long ago they were harvested. Keep an eye on the water level, to be sure the beans are always covered. They’re done when a sample bean is soft to the bite but not mushy.
3.) Use a fork or slotted spoon to remove the pepper, garlic, and onion. Drain the beans, reserving two cups of the broth and discarding the rest.
If you don’t have two cups of broth, make up the difference with water or Homemade Vegetable broth. Transfer the beans and the liquid to the pot of your slow cooker.
4.) While the beans cook, mince the garlic and chop the bell pepper and the onion. Heat the remaining tablespoon of oil in a large skillet over medium-high heat. Sauté the peppers & onions until just becoming soft with a little bit of browning.
5.) Clear a small spot, add a touch more oil if needed, & use that to sauté the garlic until fragrant, about 1 more minute.
6.) Pour one of the cans of diced tomatoes into the pan, juice and all, and use that to deglaze the pan. Scrape up all those yummy browned bits.
7.) Pour the pan contents into the crock pot, scraping the pan to get every last drop.
8.) Then pour the rest of the diced & crushed tomatoes in, add the chili powder, and stir. It will look pretty red at first, and develop a darker, richer color as it cooks. Cook for 8 to 10 hours on low. I like to serve chili with a bit of grated sharp cheddar, which of course you’ll omit if you want to keep it vegan.
