

The most tantalizing scent on the face of the earth is fresh-baked bread, don’t you agree? There are some that come close, but I think bread has to be my all-time favorite.
My first clear memory of bread was at a parade in Henrietta, NY. My grandparents lived along the parade route, so we had front-row seats. Wonder Bread had a truck in the parade, from which they tossed mini-loaves (complete with the bubbly-logo wrappers) to kids along the way. It always seemed better than the full-size loaves in the store. Maybe it was fresher, maybe it was just the excitement of having my very own, really cute, mini loaf of bread. My tastes have evolved greatly since then, and I’ve discovered how much more flavorful & richly textured “real” bread is.
I don’t recall what first prompted me to bake bread. It was many years ago. I do remember finding it a wonderful stress release. There’s the primal satisfaction of kneading, and the magic of feeling the dough gradually becoming something entirely new. It begins as a sticky mess and morphs into this wonderfully elastic thing with a life of its own. It’s hard to describe; you know how some things just feel lovely in your hands? Bread dough is like that. You’ll see what I mean.
There was a time I had to stop baking bread because I was no longer able to do the kneading. My thoughtful sister gave me a bread machine, though, & I was right back at it! Since then, I’ve acquired a stand mixer with a dough hook. So when the bread machine died a couple weeks back, I decided to try using my mixer for the dough. The silver lining is that I also get a big chunk of counter space back, which is always at a premium. (I know, if you live in a city you’d consider my kitchen big. But I live in the country, so I think it’s tiny. It’s all relative.)

I’d been using just the dough cycle & a clay baker on & off for a few years anyway, loving the shape and the texture of bread baked in clay compared to bread that went all the way through the machine cycle, so it wasn’t that big a change to eliminate the machine.
This recipe is adapted from The Bread Machine Cookbook, by Donna German. If you want to make it in your bread machine, just add another Tablespoon of water, and use the cycle for medium-size loaves. Of course, if you want to do the whole thing by hand, have at it! It’s really loads of fun. And I’m sure any medium-size bread pan would work, too, if you don’t have & don’t want the clay baker. Mine came from King Arthur. They don’t have that exact kind anymore, this one has replaced it.
(Printer-friendly recipe at bottom of page)
Ingredients:

1 cup water
3 Tbsp butter
1 Tbsp sugar
1 tsp salt
3 cups bread flour
1½ tsp yeast
1 Tbsp corn meal
Preparation:
1.) Mix the first 7 ingredients (everything but the corn meal) with the paddle of the stand mixer until blended, just a couple of minutes. Switch to the dough hook, and knead until the dough becomes smooth and elastic, about 5 minutes. Let the dough rest for 10 minutes, then knead for another 5 minutes.


2.) When the dough is kneaded enough, it will pass the windowpane test. To do this test, break off a small piece of dough, flatten it into a square, and gently stretch it. If it’s ready, it will feel elastic & you’ll be able to stretch it enough to start to see light through it a bit. If it’s not ready, just knead it a couple more minutes.


3.) Oil or grease a large bowl. The bowl needs to be more than twice the size of the dough ball. Form the dough into a ball, pinching it together at the bottom, and place the ball smooth side down in the bowl. Roll it around a bit to make sure the smooth sides are oiled, then turn it right side up. Cover the bowl with an oiled lid or an oiled piece of plastic wrap. Set in a warm spot to rise. If your kitchen is warm, the counter will be fine. If it’s a bit drafty like my kitchen on a cold day, a cold oven with the light turned on should do. When it’s really cold here, I’ll turn the oven on for about half a minute at its lowest setting before I make the dough, and turn it off just as soon as it’s a bit warmer than the room. The residual heat is perfect for rising.


4.) Let it rise until it has about doubled in bulk, around 50 – 60 minutes. To test if it’s “ripe,” gently press two fingers into the dough. If the indentations remain after you remove your fingers, you’re ready for the next step.


5.) Prepare the clay baker by oiling the inside of its top & bottom. (I use spray olive oil.) Sprinkle the corn meal in the bottom. Lightly flour your work surface, rolling pin, and hands.
6.) Form the dough into a rough rectangle. Roll it out into a rectangle about 12″ x 15″, sprinkling more flour as needed to prevent sticking. Working from the long side, gently roll the dough up into a log. Pinch the ends off towards the seam side, & place in the clay baker with the seam side down. Cover. Allow it to rise a second time, about 50 – 60 minutes.


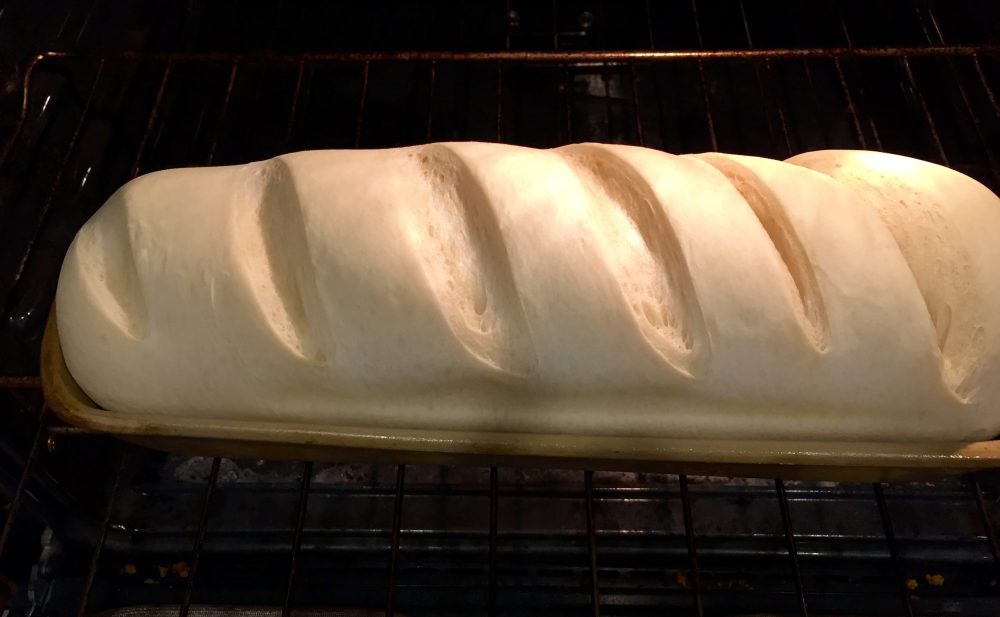
7.) The dough will have risen above the rim. Test for readiness this time by gently pressing the side of the dough. If a fingerprint remains when you remove your finger, you’re good to go. Use a very sharp knife or a razor blade to lightly score the top of the loaf. Replace the cover, and place in the cold oven.


8.) Turn the oven on to 400°F. Bake for about 15 minutes, then remove the lid. The bread should have risen even more, so that it looks quite puffy & mostly fills the baker (well above the rim of the baker’s bottom). If it’s still not much higher than the edge of the baker’s bottom, return the lid for a few minutes more.
9.) Bake another 10 minutes with the lid off, until the top of the loaf is a deep, golden brown. Remove from oven to a wire cooling rack, and let cool about 5 minutes before turning out of the clay baker onto the cooling rack. Let cool nearly to room temperature before slicing. (Good luck with that. I think it’s the hardest part of the whole process!)


Portuguese Bread
Ingredients
1 cup water
3 Tbsp butter
1 Tbsp sugar
1 tsp salt
3 cups bread flour
1½ tsp yeast
1 Tbsp corn meal
Directions
1.) Mix the first 7 ingredients (everything but the corn meal) with the paddle of the stand mixer until blended, just a couple of minutes. Switch to the dough hook, and knead until the dough becomes smooth and elastic, about 5 minutes. Let the dough rest for 10 minutes, then knead for another 5 – 10 minutes.
2.) Check the dough’s readiness with the windowpane test. If it’s not ready, just knead it a couple more minutes. If it’s ready, proceed to step 3.
3.) Oil or grease a large bowl. Form the dough into a ball, pinching it together at the bottom, and place the ball smooth side down in the bowl. Roll it around a bit to make sure the smooth sides are oiled, then turn it right side up. Cover the bowl with an oiled lid or an oiled piece of plastic wrap. Set in a warm spot to rise.
4.) Let it rise until it has about doubled in bulk, around 50 – 60 minutes. To test if it’s “ripe,” gently press two fingers into the dough. If the indentations remain after you remove your fingers, you’re ready for the next step.
5.) Prepare the clay baker by oiling the inside of its top & bottom. Sprinkle the corn meal in the bottom. Lightly flour your work surface, rolling pin, and hands.
6.) Form the dough into a rough rectangle. Roll it out to a rectangle about 12″ x 15″, sprinkling more flour as needed to prevent sticking. Working from the long side, gently roll the dough up into a log. Pinch the ends off towards the seam side, & place in the clay baker with the seam side down. Cover. Allow it to rise a second time, about 50 – 60 minutes.
7.) The dough will have risen above the rim. Test for readiness this time by gently pressing the side of the dough. It’s ready if a fingerprint remains when you remove your finger. Use a very sharp knife or a razor blade to lightly score the top of the loaf. Replace the cover, and place in the cold oven.
8.) Turn the oven on to 400°F. Bake for about 15 minutes, then remove the lid. The bread should have risen even more, so that it looks quite puffy & mostly fills the baker. If it’s still not much higher than the edge of the baker’s bottom, return the lid for a few minutes more.
9.) Bake another 10 minutes with the lid off, until the top of the loaf is a deep, golden brown. Remove from oven to a wire cooling rack, and let cool about 5 minutes before turning out of the clay baker onto the cooling rack. Let cool nearly to room temperature before slicing.

I thoroughly enjoyed reading this article. I was not familiar with the ceramic bread bowls and found it very informative. It has been years since i baked bread. Just may have to put it on the schedule. You are right, nothing smells as good as home made bread! Thanks
LikeLike
Thanks! I think the baker is clay, rather than ceramic. Not sure if that makes any difference one way or the other. I do know that, other than oiling it (I use spray olive oil) before baking & wiping with a paper towel after, there’s zero maintenance. I’m sure I’ve had mine at least 15 years!
LikeLike
nice!
LikeLike
Thanks! It makes great toast, too, if you’re lucky enough to have leftovers.
LikeLike